I just finished modeling Aladdin Lamp using "Imagine & Shape" module. I did not make a video tutroial showing how to model it because it was made by trial and error. Nevertheless, in this tutorial, I will show you how to use the tools I used to model this lamp in the imagine and shape module. Here are the images of the lamp:


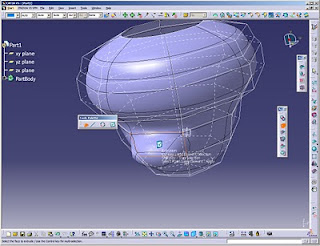
- Revolve tool: This tool is used to create the main structure of the lamp. Upon clicking on this tool, you are asked to draw the profile which will be revolved, as shown in the following image.
 |
| Revolve Tool |

- Extrusion Tool: This tool is used to create the tail of the lamp. Upon clicking on this tool, you will be prompted to click on the main structure which is the bowl of the lamp, then choose the the face subdivison that will be extruded. you can select the subdivision using edge selection or face selection. I prefer using face selection tool. you can choose more than one face while clicking on the CTRL button. Upon finishing, click on the right button
 |
| Extrusion Tool |

- Face Subdivision: This tool is used to create the spout of Aladdin's Lamp. Upon clicking on this tool, you will be prompted to click on the main structure which is the bowl of the lamp, then choose the face subdivision that will be extruded. On the right side of the window, a ratio bar will appear which upon moving, the division of the face will increase or decrease up to your spout diameter. Upon finishing, click on the right button.
 |
| Face Subdivision |

- Modification (Space): This tool is used to shape the spout and the tail of the lamp. This tool is used to modify, translate, rotate and align the structure parts. You can choose either to modify the vertices, the edges or the faces and you can also choose to modify all of them . You may switch the propagation option on, while translating the structure.
 |
| Modification Tool |

- Working Zone Definition: This tool is used to shape the spout of the lamp. Upon choosing this tool, you may define the spout parts that you want to manipulate away from the rest of the lamp. This tool gives you the advantage of manipulating some parts of the structure without affecting the rest of the structure. After selecting the working zone, click on the manipluation button to manipulate this working zone.
 |
| Working Zone Definition |
- Erasing: This tool is used to erase the the front face of the spout. upon choosing this tool, you may select the face that will be removed.
 |
| Erasing Tool |

- Face Cutting: This tool is used to cut edges with all-round through edges and thus creating more faces all around the bowl. This gives the designer more freedom to manipulate the structure.
 |
| Face Cutting |


